Improving Support Workflow Through Human-Centered Design
Part of my job at work involves taking on support tickets that come in from our clients. This entails taking responsibility for the ticket, responding to it in a timely matter, following through until it is resolved, and ensuring the client is satisfied. All of this is done in addition to other projects that I do at work.
Typically, this duty is shared amongst everyone in my team of five people, including sometimes my manager. Everyone shares the tickets based on who is most available. Shortly after I started working at my company though, one person on my team moved to another team, and for a period of time, almost half of the team was away on business trips or vacation.
It was during this time that my time management and organization abilities were stretched to their limits. It was a challenge that volunteered for, and I enjoyed taking on. Based on the lessons that I learned, I made it an initiative to improve the support workflow that we had in place using human-centered design.
What is Human-Centered Designed?
According to Design Kit, Human-Centered Design can be summarized as follows:
It’s a process that starts with the people you’re designing for and ends with new solutions that are tailor made to suit their needs. Human-centered design is all about building a deep empathy with the people you’re designing for; generating tons of ideas; building a bunch of prototypes; sharing what you’ve made with the people you’re designing for; and eventually putting your innovative new solution out in the world.
In other words, it is creating something that is optimized for human users. This may sound like an obvious thing that should be a given, but you would be surprised at how many systems out there fail to be user-friendly, and how difficult it is to create something that is truly human-centered.
The Process
I followed a process very similar to the one that was outlined also by Design Kit:
Human-centered design consists of three phases. In the Inspiration Phase you’ll learn directly from the people you’re designing for as you immerse yourself in their lives and come to deeply understand their needs. In the Ideation Phase you’ll make sense of what you learned, identify opportunities for design, and prototype possible solutions. And in the Implementation Phase you’ll bring your solution to life, and eventually, to market. And you’ll know that your solution will be a success because you’ve kept the very people you’re looking to serve at the heart of the process.
The actual process that I followed looked something like this:
-
Discover: define and understand the problem using empathy to identify needs.
-
Brainstorm: use the knowledge gained from the discovery process to come up with ideas.
-
Prototype: communicate solutions to problems using insights learned
-
Repeat.
Discovery
Original Workflow
The original support workflow was as follows:
-
Client sends an email to a designated support email.
-
A support ticket is generated in FogBugz.
-
Assign the ticket to yourself on FogBugz using a custom-built web application everyone on our team has access to.
-
Work on the ticket, and respond to the client.
-
If the ticket has been resolved, then mark it “Resolve (Responded)” on FogBugz.
-
Once the client is satisfied, then mark the ticket “Closed”.
Although the original workflow worked just fine, there were a few things that could have been improved on. For example, once the support ticket has been assigned to yourself in step 3, all changes to the support ticket must be done on FogBugz, which doesn’t have a very user-friendly interface, and can get tedious when making changes to the state of the support tickets.
Once a ticket was assigned to yourself and marked “Resolved (Responded)” on the web application, you would have to find the ticket again on FogBugz by searching based on the ticket’s identification number, if you wanted to close the ticket. It does not remain shown on the web application, so there is no way to keep track of all of the tickets that you are working on from the beginning of the workflow to the very end. In addition, once a ticket has been closed, it becomes very hard to find the ticket again.
More importantly, the steps in the original workflow do not fully reflect the full process that typically takes place when you are working on a support ticket. Between steps 4 and 5, a number of different things can happen.
In an ideal situation, a client opens up a support ticket, you respond to it in one email with the right solution, the client responds saying that the issue is resolved, and you close the support ticket. Most of the time, this is not the case, and with the original workflow, it is very easy to quickly become disorganized and overwhelmed as the volume of tickets increases.
Typically, there is a lot of back and forth between yourself and the client. Usually, the first email from the client does not have all of the information that you need, and one or more additional emails must be exchanged before you are able to respond with a solution. Sometimes, many solutions need to be offered before there is one that works, or there is additional work required either by the client or by my team.
The support workflow is very non-linear, and can be cyclical at times.
Being able to visually track support tickets as they come in and are being worked on will not only allow for better organization, but will improve productivity, as you can be assured that you are on top of the support tickets and are working on the most important ones first.
Brainstorm
Based on my experience being the main person in charge of support for a few months, I have found that when a support ticket is opened by a client, there are only five major states that it can be in:
-
Incoming (need to respond)
-
Need more information (sent email ask for information, waiting for response, follow-up after a day)
-
Have enough information (sent email to acknowledge we received the inquiry, currently investigating)
-
Responded with solution (waiting for response, follow-up after 2 days to see if resolved)
-
Closed
Every support ticket that comes in can fit into these 5 categories, and typically, during the lifecycle of a given support ticket, it may go between states two to four many times before finally being closed. So whatever improvement that I would want to make needs to have a way to easily show what state a ticket is in, as well as all of the tickets that are currently active and being worked on.
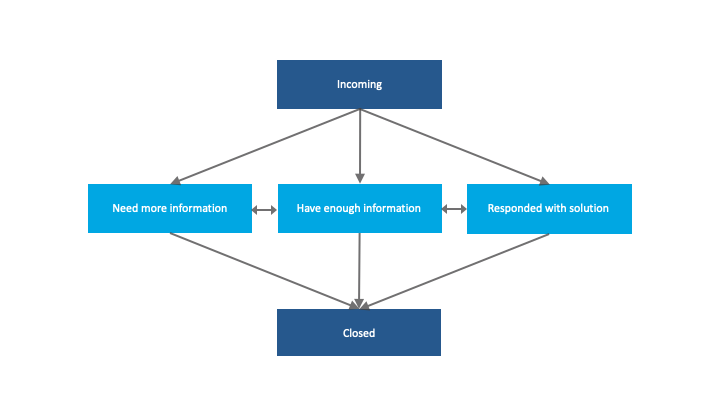
This solution would probably have each of the 5 categories as a list, and I would be placing each support ticket under one those categories, moving them around as the status of the ticket changed.
At first, I tried just writing down all of the support tickets that I am working on in a notebook (I tried both physical and digital), but I found that it was difficult to keep track of tickets still, especially when there was a high volume. Support tickets were too dynamic, and at a given time there may be many tickets in many different states.
Fortunately, I have been a long-time user of Trello, a web application based around the Kanban system of project and task management, and realized that it would be a perfect tool to use for my prototype.
Prototype
Setting up a prototype was simple — all I had to do was create a new board in Trello, and set up lists for each major state outlined in Brainstorm. As support tickets came in, I would assign them to myself and create a card in Trello to represent that support ticket. I would then move the card between the different lists, based on what state the support ticket was in.
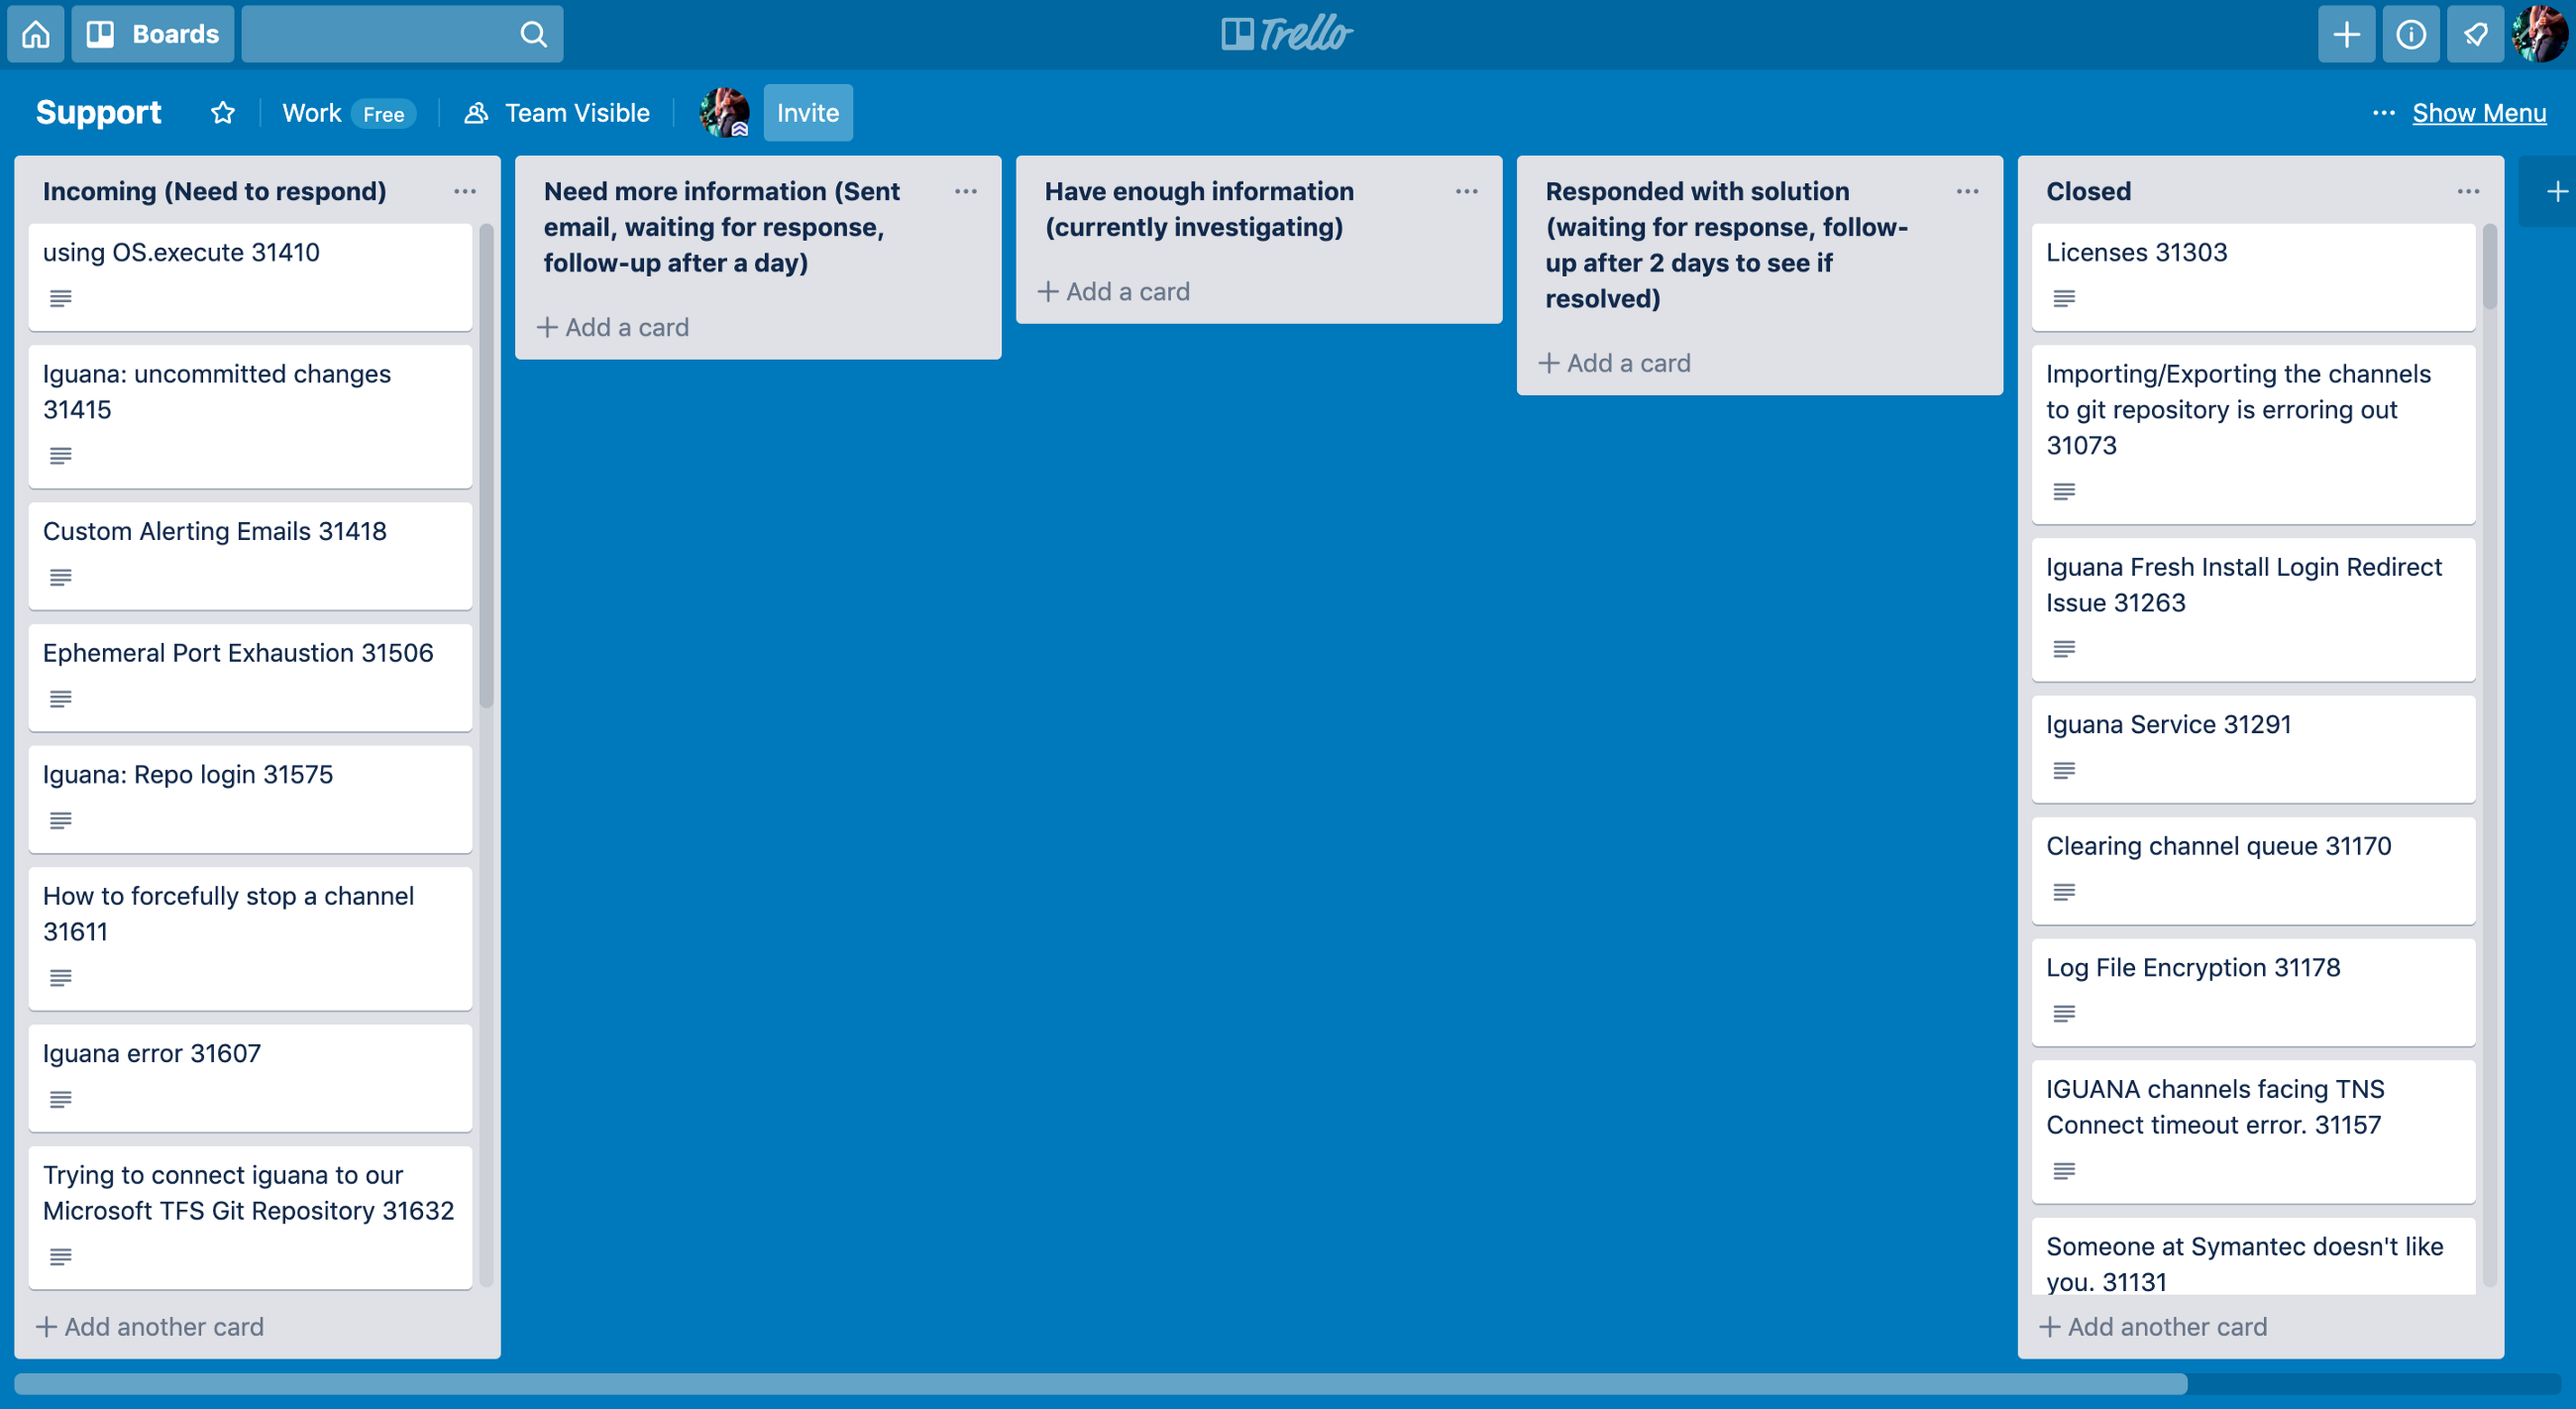
I gave this a try for a few weeks, and I immediately noticed that I felt less stressed, since I have a high-level view of all of the support tickets that I was working on at a given time, and what states they were all in. I liked the ease of which I could move cards around between different lists.
More importantly, I could rest assured that I would not be missing any tickets that I was working on, and that I only had to worry about what was on this Trello board.
The last step to improve this even further was to automate the creation of cards, as well as automatically setting the status of each support ticket in FogBugz through the Trello user interface, without having to go into FogBugz and manually setting the status of the FogBugz tickets (which was one of the pain points outlined during the Discovery step).
Integrating FogBugz with Trello
Rather than having to manually create a Trello card myself every time a new support ticket came in and was assigned to myself, I wanted to automatically generate the Trello card instead. The created card should have information such as the ticket number, the subject line of the support ticket, as well as a link that would take me directly to the FogBugz page for the support ticket.
To do this, I implemented some scripting in a programming language called Lua, and I used an integration engine called Iguana to run the script on a regular basis (there are other ways to do this, but I work with Iguana on a daily basis as part of my job, so it was the best tool at the time to use).
Fortunately, both Trello and FogBugz have fairly comprehensive APIs and documentation, which were more than adequate to implement the kind of workflow I was looking for.
The high-level scripting workflow looked like this:
-
Use the FogBugz API to get all new tickets that were assigned to me, and create a card in Trello in the “Incoming (Need to Respond)” list using the Trello API. Each card would contain the FogBugz ticket number, subject line, and a link to the ticket in FogBugz.
-
If the card was moved to the “Responded with solution” list (the Trello API would be used to regularly poll this list for new cards), then change the status of the ticket in FogBugz to “Resolve (Responded)” using the FogBugz API.
-
If the card was moved to the “Closed” list (the Trello API would be used to regularly poll this list for new cards), then change the status of the ticket on FogBugz to “Closed” using the FogBugz API.
Automating the workflow this way also helped to solve one of the big problems that I was experiencing with the original workflow outlined in Discovery, which was that of having to use the FogBugz user interface to change the status of support tickets. This way, I would never have to actually interact with the FogBugz interface, and even if I did, the FogBugz ticket was linked in the Trello card itself which made finding the ticket significantly easier.
Repeat
True human-centered design is an iterative process, and typically after the first iteration, there is further user testing done, after which the entire process is repeated again with the newfound insights gathered from the user testing.
In this case, the user testing consisted of me using the system that I developed over the course of a few months, where I used this system on a daily basis. During that time, I did make a few changes that improved the usability of my system.
One thing that was improved was to add a due date on the Trello cards. If I need to follow-up on a support ticket after two days, then marking the due day to be in two days would help me keep track of which tickets needed a follow-up, ensuring I don’t fall behind on any of the tickets.
The rest of the changes made had more to do with the code itself, and less with the new workflow (this will be for another article!).
Results & Lessons Learned
I used this system for many months, before my support workload decreased to the point where the system that I developed was a bit of an overkill. Although it would have been perfectly fine to continue using this system, it seemed to me that below a certain threshold of support tickets being managed (i.e. anything less than taking on the majority of incoming support tickets on a daily basis), it was really simpler to just use the old workflow described in Discovery.
During the months that I did use my system though, I was significantly more organized than I was before. Many of the pain points that I had described in Discovery were solved using this system.
I realized afterwards that what made this system work well was that I was no longer depending on my memory for keeping track of support tickets — every incoming ticket was automatically tracked, in one place, without having to keep track of anything in memory. As mentioned in David Allen’s Getting Things Done system, one of the big things that hinders our productivity is when we store things in our mind that should really be written down.
I ended up showing this system to my colleagues and boss, who were all impressed with the system, and we ended up incorporating different aspects of this system into the current support workflow.
Even though we ended up not using Trello to keep track of the tickets (we used Basecamp instead, as that was a tool our team was already using), the spirit of this system remained in place.
Conclusion
This little project that I did was an experiment that I did on my own time out of curiosity. I had a lot of fun pretending to be a UX designer on my spare time, and it really did give me a lot of appreciation as to how important good UX design is, in any discipline. It’s unfortunate, especially in the IT world how under-appreciated UX design can be, but I hope that after reading this, you might have a different perspective.
Thank you for reading!